Dear Preppers and Survivalists,
 |
|
photograph by
Wolfgang Sauber
|
About two years ago, (scroll 7/8s of the way down) I built a bed using dimensional lumber from the local big-box lumber store. It was a success, but I need a larger 'secret' storage compartment, now.
So, ...
Needed Supplies
2 * 2 X 10 X 98 inches
1 * 2 X 8 X 98 inches
4 * 2 X 4 X 98 inches
1 * 1 X 3 X 98 inches
3 * Sheets of Plywood 5/8 inch thick.
1 * Box of 3 inch long deck screws, one pound
1 * Box of 2 inch long deck screws, one pound
1 * package felt pads (if you have wood floors)
Safety Supplies
Hearing Protection (Earplugs)
Eye Protection (Safety Glasses)
My Brain (Hey, you have to think to be safe)
Needed Equipment
Wood Saw (Circular Saw Preferred)
Extension Cord (50 feet)
Tape Measure
Pencil
Framing Square or a short and long straight board
Drill with Phillips screw bit (Electric Drill Preferred)
Sawhorses, one set
First Things, First
All of our family's beds are queen sized, so I measured the mattresses. They are 80 inches long and 60 inches wide. If you plan to build a bed for a different sized mattress, you'll have to measure them to get a custom fit.
Next, I drove into town purchased the needed material, drove home, collected the needed tools, and found a shady spot to work.
Yes, I had to go back into town, a second time, but that's another story ; - )
Making the 'Frame'
First off, to keep Katniss happy, I did all my cutting out in the yard, so I set up the sawhorses in a shady, level spot.
Next, I cut the 2 X 10s to 79 and 1/2 inches.
Why? To keep the frame from sticking out too far. It seems, I hit my shins on the original 80 inches bed.
Next, I cut the single 2 X 8 into two 45 inches pieces. After I cut it to length, I found the center and cut a notch on both sides. The notch is 1 1/2 inches deep and 3 1/2 inches wide.

To mark the 2 X 8 for the notches, I found the center, made a mark with the pencil then measured 1 3/4 inches on either side of the mark. Next, I measured from the edge 1 1/2 inches creating a box. Then, I set may circular saw blade to 1 1/2 inches and cut the box out.
Needless to say, I made a mistake, and I had to go back to town for another 2 X 8.
After cutting the 2 X 10s and 2 X 8, I cut the 1 X 3 into a bunch of 8 inch long pieces. These pieces will be 'feet' for the bed frame.
Next, I cut two of the 2 X 4s to 56 inches long and the other two 2 X 4s to 53 inches long.
With everything cut, I attached the 'feet' to each end of the 2 X 10s and the middle with two 2 inch deck screws, per foot. I then added a felt pad to each foot.

I made sure to countersink the screws, just a little bit, to keep the screws from possibly scratching the floor.
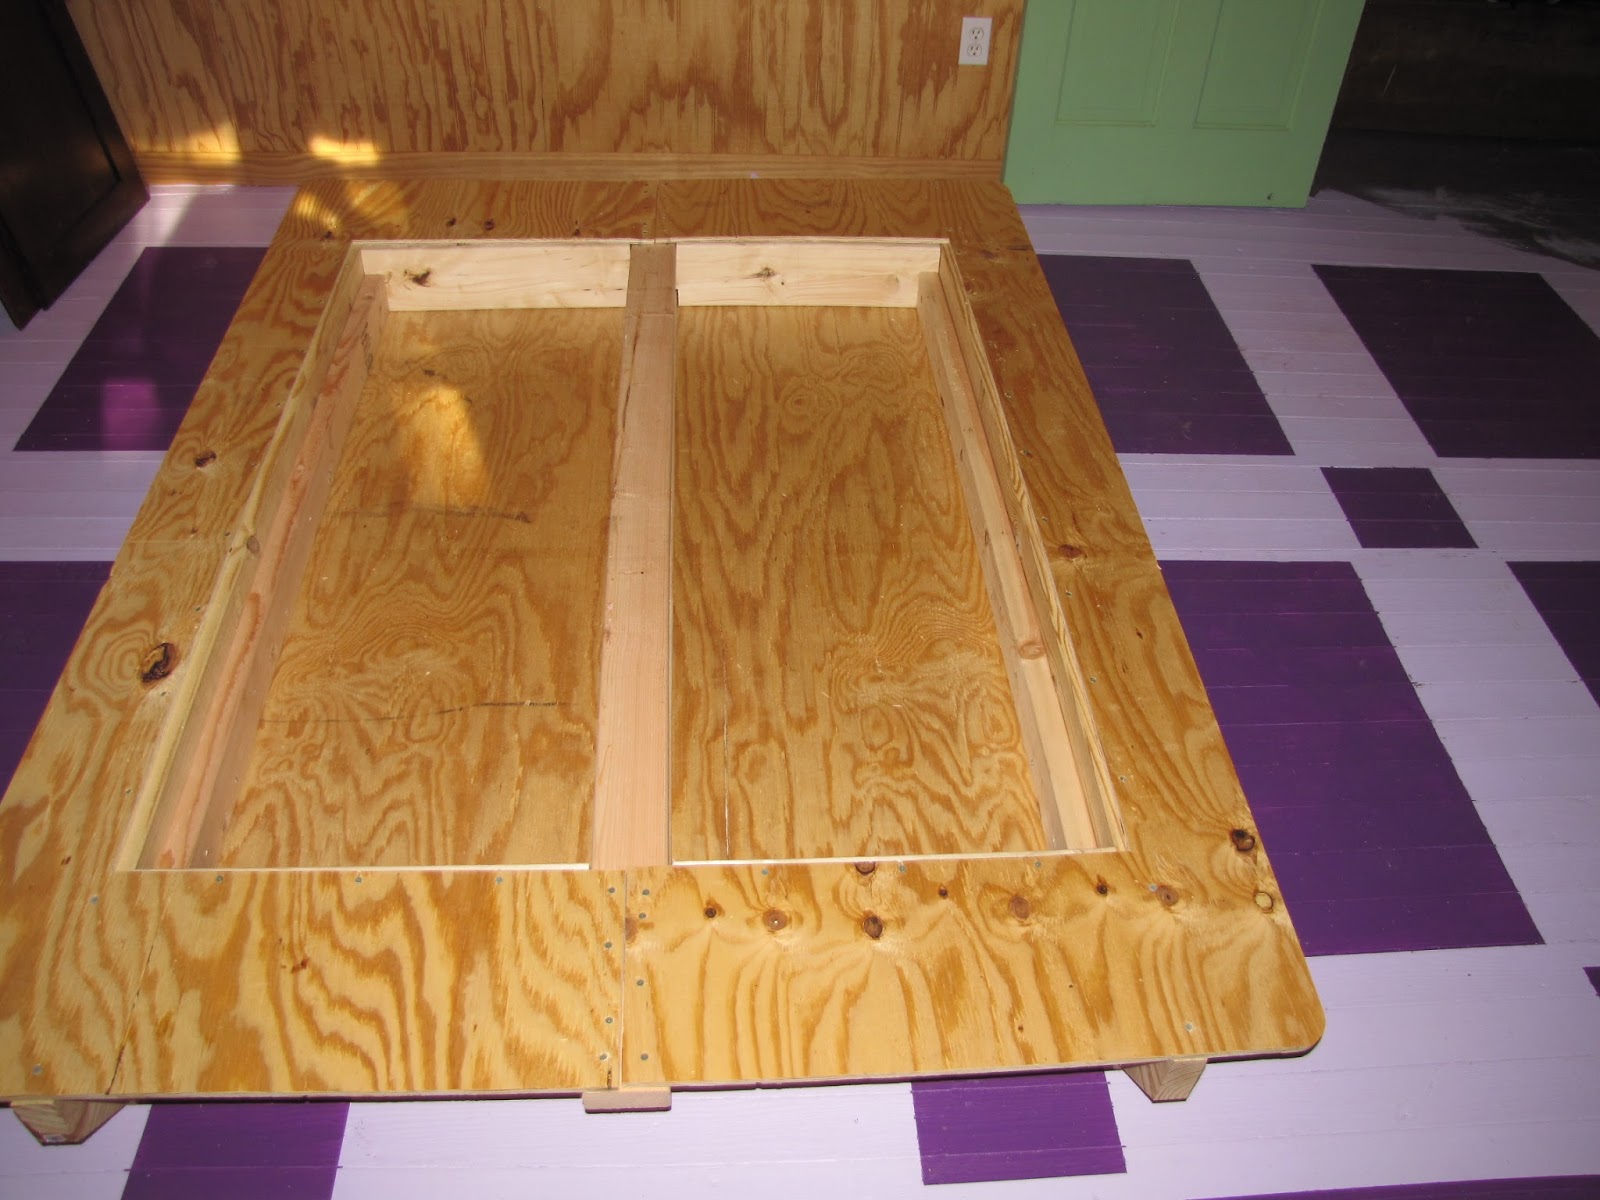
Next, I carefully carried all the cut pieces inside and upstairs to where I would build the bed. I laid out the two 2 X 10s on the floor and placed the 2 pieces of 2 X 8 in between them.
Next, I attached everything with 3 inch deck screws.
The 2 X 8s were screwed, using three deck screws, one foot in from the top and bottom. The 2 X 8s were also leveled with the top of the 2 X 10s, to form a level surface.
One of the 56 inches long 2 X 4 was screwed into the bottom notch while the two 53 inch long 2 X 4s were screwed along the side of the 2 X 10s, level with the bottom of the 2 X 8.

As you can see, in the above picture, a frame is created within the 2 X 10s. This frame is 56 inches long by 45 inches wide. The frame is recessed about 1 1/2 inches from the bottom of the 2 X 10, to allow air to circulate under the bed.
Next, I went downstairs and cut a piece of plywood into a 56 inch by 45 inch rectangle. Then, ... I carried it upstairs and attached it to the bottom of the recessed frame with 2 inch deck screws along the edge and the middle. I also used 3 inch deck screws at the corners and along the middle edges.
The next one I build. I will also glue the plywood to the frame for added strength.

If you embiggen the picture, you might be able to count how many screws I used to hold the bottom.
After everything was attached, I carefully laid the bed frame on the floor. Be careful, it's starting to get heavy.
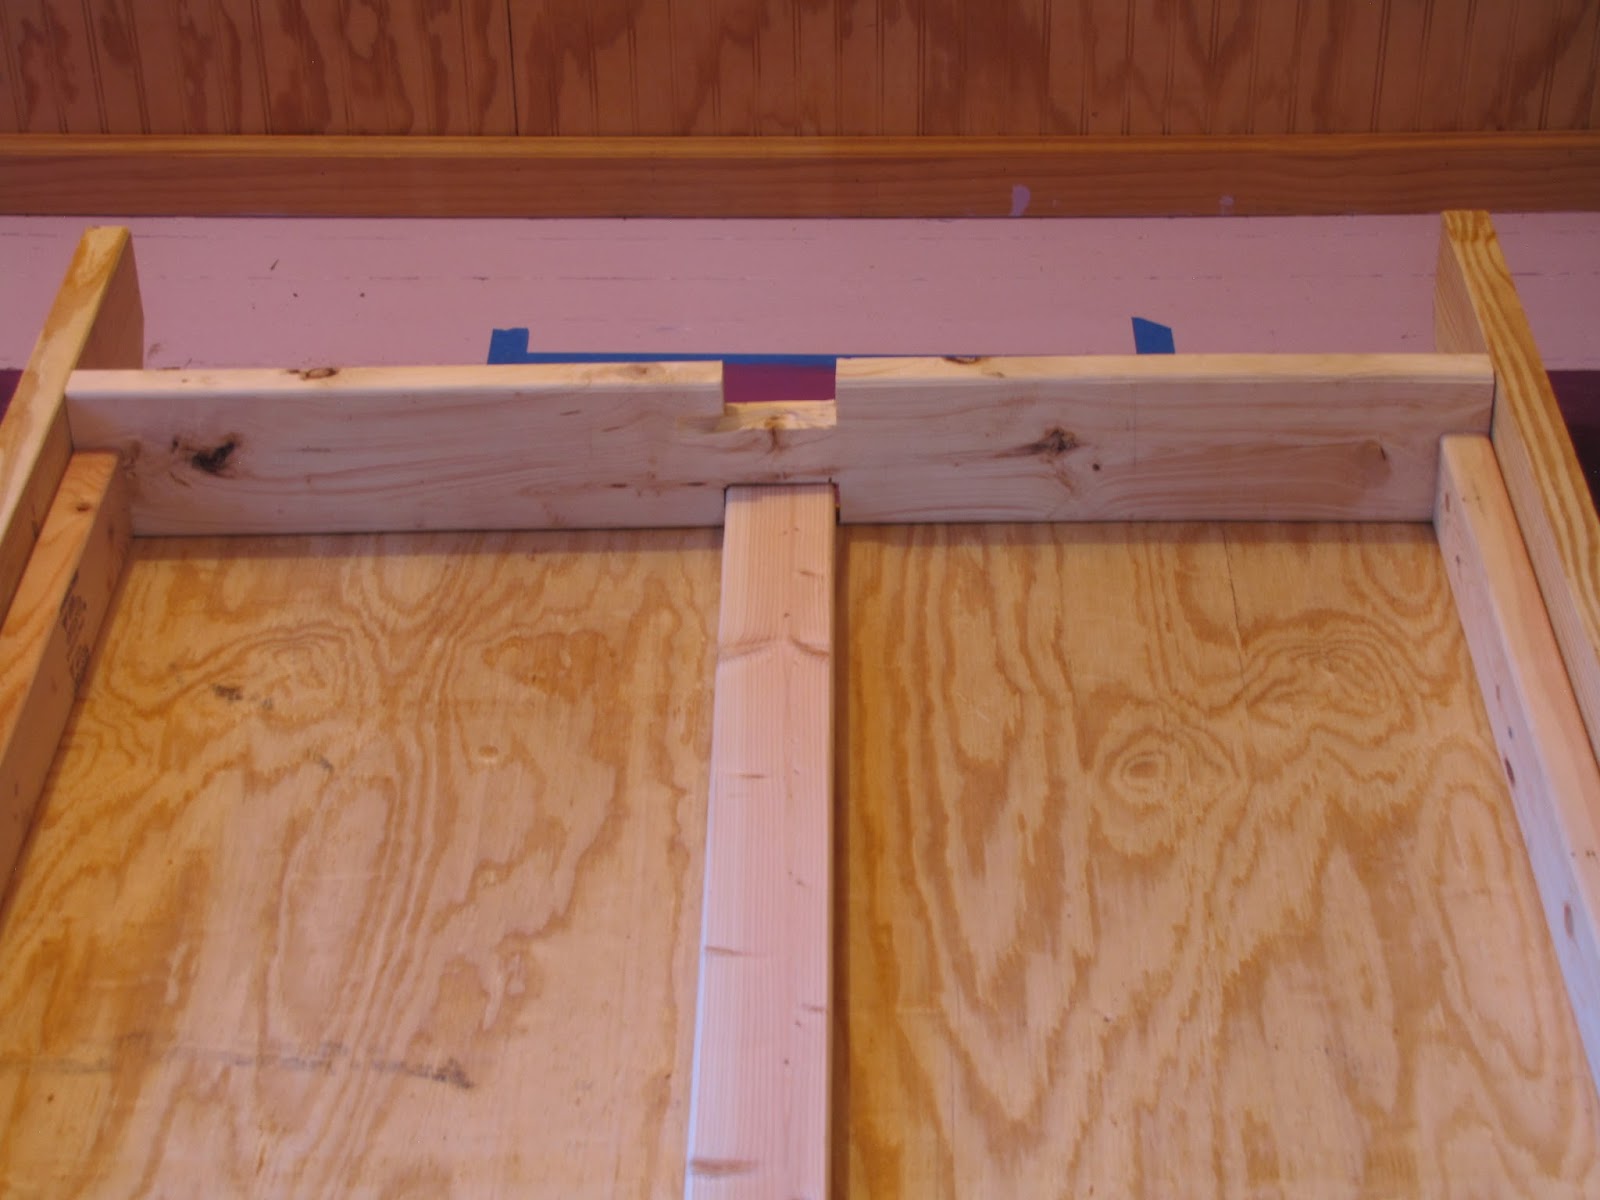
Next, ... I want downstairs, grabbed a drink of water and cut the remaining 2 X 4 to 79 1/5 inches long. Carried it up stairs and laid it in the top notch.

I did not attach it to the 2 X 8, yet.
Next, I went down the stairs and started cutting the other two pieces of plywood to the proper dimension.
Now, I can be crazy, as you can see in this project, so there are a couple of ways to finish this bed frame. You could cut the two pieces of plywood down to 79 1/2 inches long by 29 3/4, fill the cache and screw the two sheets of plywood to the frame. Securing the 2 X 4 in the process.
Then, when you need something out of the cache, you unscrew the plywood and pull whatever you wanted out and go from there.
Or, ... You could cut the middle of the plywood out and make two 'doors' for the cache.

To do this, is pretty simple.
First, cut the two pieces of plywood down to 79 1/2 inches long by 29 3/4 wide.
Next, taking a sheet of paper (so you don't forget) draw a picture like this.
ADD DRAWING
Then, measure from the top edge of the bed frame, along the 2 X 10, to the middle of the 2 X 8 (the cross piece). The measurement should be around 12 3/4 inches. This will give the plywood an overlap of about 3/4 inc for securing the plywood to the 2 X 8. Make sure to measure both left and right hand side, to make sure they're even.
Next, measure the bottom.
Starting from the bottom edge, along the top of the 2 X 10, measure to the middle of the 2 X 8 (the cross piece). Once again, this measurement should be around 12 3/4 inches. Make sure to measure both sides, to make sure they are even.
Next, measure between the 2 X 10s, from the middle to middle. This measurement should be 46 1/2 inches. This allows the plywood to overlap 3/4 inch on each 2 X 10.
After all this is done, I'm almost ready to cut the opening for the plywood to size, but first, I have to mark the plywood.
First, mark the top and bottom on each sheet of plywood (cut down to 79 1/2 inches long by 29 3/4 wide) I want all the way across, so I would be able to easily transfer my other measurements.
Next, you will have to divide your, between the 2 X 10, measurement. It should be 23 1/4 inches.
Now, here comes the hard part. I have to remember which sheet of plywood is going to be the right and which one is going to be the left, also the top and bottom of each sheet.
I always write on the plywood, left, right, top, and bottom ; - )
Once I determined left and right; I measured from the middle, marking the 23 1/4 inches.
Warning:
A long time ago, I learned to measure twice and cut once.
So, ... I made sure to remeasure everything a second time to make sure all the dimensions were correct, before cutting the plywood.
After all the measurements have been marked on the plywood, I'm ready to cut.
So, .. I reset the circular saw's blade for cutting plywood. Yes, I unplugged the saw ; - )
Once, the two sheets of plywood are cut, I will have two "C" shaped pieces and two small plywood sheets 23 1/4 wide by 54 1/2 inches long.
Once I had these four pieces of plywood, I carried them upstairs and test fitted the "C" shaped pieces to the frame, making adjustments as needed. Of course, I needed to make an adjustment, (I didn't like the fit) so I carried them downstairs and shaved about an 1/8 inch off the top and bottom of the "C."
Once that was done, I used 2 inch deck screws to attach the plywood to the frame. Starting at the top, attaching the plywood to the 2 X 10s first then moving down to the bottom, attaching the plywood to the 2 X 10s. Next, I attached the middle of the plywood to the 2 X 10s and 2 X 8s.
And, ... That is when I adjusted the 56 inches long 2 X 4 to properly fit.
Once, I was finished, I placed the cache's cover (found they didn't fit, too big) on the opening and called it good (after I cut about 1/4 inch off each side, so they would fit properly)

Next, I took a full sized flat sheet and placed it on top the bed frame and started placing the box springs and mattress on the bed frame. This protects the box springs from the plywood.
The Biggest Mistake
Of course, I made a mistake.
The cache isn't deep enough to hold .50 caliber ammo cans, not even on their side.
Only .30 caliber (small) ammunition containers (ammo cans) can fit in this cache.
Oh well, ... Version 3.0, here I cut ; - )
Doesn't Fit the Narrative
As (almost) always, some of the pictures didn't fit the narrative.

This picture is one of the middle 'feet' with the felt pad attached. In the future, I would bevel the ends of the feet, so it looks nicer.

This picture gives you an idea of how the 2 X 8s are positioned on the 2 X 10s, with the tops level and the bottom about 1 to 2 inches from the bottom, allow air circulation under the bed.
This picture shows how the 2 X 4s butt up to the 2 X 8s making a frame to secure the bottom, with screws.
I used an electric drill to screw the screws through the 2 X 10s. I wanted it as strong as possible, to carry a lot of weight.