Welcome Preppers and Survivalists,
For some reason or another, I can not think of a good opening to this article. At first, I was going to start with: "According to the Latter-day Saints, a year supply of sugar for one person ranges from 35 to 100 pounds," but that opening didn't work very well. So I changed it to: "Sugar in the last few years has doubled in price. Plus, sugar can be stored indefinitely (forever)," but, that didn't work either, so I started writing the article and as you can tell, I still don't have a decent opening.
Materials Needed:
1 - 5-gallon Plastic Bucket with Lid
1 - Mylar Bag
1 - 25 pound bag of Sugar
1 - 10 pound bag of Sugar
Tools Needed:
Clothes Iron
Rubber Mallet
2X4 wrapped with a Bath Towel
Safety Equipment:
Your Brain
First, you will need to gather your supplies and material. In this picture, I have a 25-pound bag and a 10-pound bag of sugar, a 5-gallon plastic bucket with a lid, and a mylar bag.

Next, I take the mylar bag and fold it into a "S" shape before placing it into the bucket. The "S" shape allows the bag to expand to fit the bucket as the mylar bag fills with sugar.
Next, I pour the sugar into the mylar bag.
I pour the 10-pound bag of sugar into the mylar bag then the 25-pound bag of sugar. I do it this way because it is easier to control a 10-pound bag (Imagine juggling to hold the bag open as you pour the sugar into the bag without spilling any) Plus, this allows me to shake the bucket to shift the sugar, so it spreads the mylar bag open to make pouring the 25-pound bag of sugar a whole lot easier.
Once, all of the sugar has been poured into the bag; I shake and roll the bucket to compact the sugar. Next, I take a clean dry towel and wipe the top inside edge of the mylar bag. (Both of these steps are important)
Next, I take a short piece of wood wrapped in a towel and place it on the edge of the bucket. I fold the edge over, and with an iron set on medium-high, I iron the edge of the mylar bag.
I leave a small opening, at one of the corners, to suck some of the air out of the bag. (another important step)
Once I remove the excess air, I seal the bag and iron a 2-inch seam. Now, I make sure that I seal the mylar bag at the very top because I can reseal the bag if I have to open it for some reason.

Next, I use a permanent marker and print on the seam "Sugar." Next, I fold the bag over making sure all of the bag is inside the bucket (This is real easy, if you remembered to suck most of the air out of the bag) and put the lid on using a rubber mallet. After the lid goes on, I print the contents of the bucket and how much is in the bucket.
Next, I place a label on the bucket's side. The label has the contents, weight, the date it was packaged, and the best used by date.
Yep, this picture shows a bucket that was packed back in 2007.
Lastly, this method can be used for any long-term storage of basic food such wheat, rice, and/or beans, but you will need oxygen absorbers to insure a long shelf-life.
OK. Really lastly. I store the filled bucket in a cool dry place, on
pallets.
As always, there are pictures and things I wanted to say that don't fit into the article.
To the right is a picture of the mylar bag with the edge folder over the towel with the seam ironed almost to the corner, and the excess air sucked out of the bag, just before I sealed the bag completely.
Yeah, for some reason the picture didn't upload the way I wanted it to, but you get the idea.
This is a close-up of the 2-inch seal with the corner still unsealed.
To suck the air out of the bag, I stick my finger in the bag and make a opening (like a tube) all the way to the sugar then I put my mouth on the opening and suck the air out.
Now, don't suck too hard because you'll suck-up some sugar. Plus, don't slobber because you want the sugar to stay clean/dry.
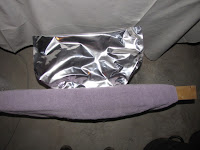
Here is a side view with the towel wrapped 2X4 laying on the top of the bucket and the just sealed mylar bag.
Lastly, this picture illustrates how tall the mylar bag is compared to the 5-gallon plastic bucket before filling with sugar. Trust me, you will need all of that excess length once you start filling the mylar bag with your long-term food.
Finally, instead of buying a 50-pound bag of sugar, I buy a 25-pound and a 10-pound bag of sugar because a 5-gallon bucket will only hold 35-pounds of sugar. Trust me, again. I tried to fit more sugar in the bucket; It didn't end well. Plus, it's easier to track how much sugar you have put in the bucket.
My suppliers are:
* mylar bags and oxygen absorbers -
Walton Feed. A good company with competitive prices
* sugar - Costco, and/or a local grocery store
* plastic buckets - Sorry, it's a secret, but
United States Plastic is an internet source that I have used in the past.


